Table of Contents
This page is a gentle introduction to rule writing, and the Rule Designer.
Using the designer is useful both to write Java rules and XPath rules, but it’s more specifically geared towards XPath rules. This page uses a simple XPath rule to illustrate the common workflow. We assume here that you already know what XPath is and how to read basic XPath queries. W3C has a good tutorial here if you don’t (in the context of XML only), and the Saxon documentation features a comprehensive but approachable description of the syntax of XPath expressions.
The Rule Designer
The rule designer is a tool that packs a lot of features to help you develop XPath rules quickly and painlessly. Basically, it allows you to examine the AST of a code snippet and evaluate an XPath expression against it. You can launch it from Command Line as follows:
<div class="tab-pane fade show active" id="linux-designer" role="tabpanel" aria-labelledby="linux-tab">
<figure class="highlight"><pre><code class="language-bash" data-lang="bash"><span class="gp">~ $ </span><span class="s2">pmd</span> designer </code></pre></figure>
</div>
<div class="tab-pane fade" id="windows-designer" role="tabpanel" aria-labelledby="windows-tab">
<figure class="highlight"><pre><code class="language-bash" data-lang="bash"><span class="gp">C:\> </span><span class="s2">pmd.bat</span> designer </code></pre></figure>
</div>
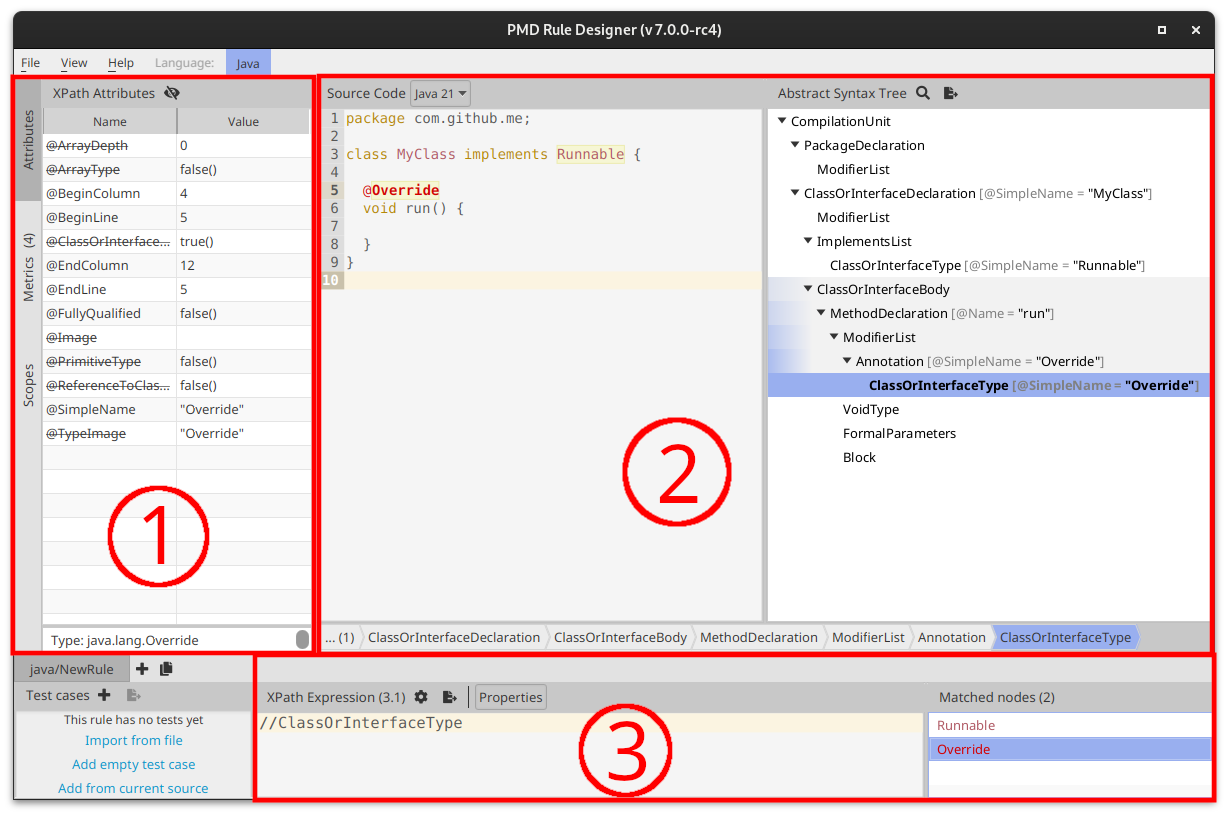
The interface looks like the following:
 </figure>
The zone (2) is the main editor. When you write a code snippet in the code area to the left, you’ll see that the tree to the right will be updated automatically: it’s the AST of the code. Note that the code snippet must be a syntactically valid compilation unit for the language you’ve chosen, e.g. for Java, a compilation unit necessarily has a top-level type declaration.
If you select a node in the AST, its specific properties will also be displayed in the panel (1): they’re the XPath attributes of the node. More on that later.
The zone (3) is the XPath editor. If you enter an XPath query in that area, it will be evaluated on the current AST and the results will be displayed in the list to the bottom right.
Rule development process
The basic development process is straightforward:
- Write a code snippet in the main editor that features the offending code you’re looking for
- Examine the AST and determine what node the violation should be reported on
- Write an XPath expression matching that node in the XPath editor
- Refine the XPath expression iteratively using different code snippets, so that it matches violation cases, but no other nodes
- Export your XPath expression to an XML rule element, and place it in your ruleset
Each time you test your rule against a different snippet, it’s a good idea to save it to make test cases.
In the following sections, we walk through several examples to refine your rule.
A simple rule
Let’s say you want to prevent your coding team from naming variables of type
short after your boss, whose name is Bill. You try the designer on the following
offending code snippet:
public class KeepingItSerious {

    public void method() {
        short bill; // LocalVariableDeclaration
    }

}
Examining the AST, you find out that the LocalVariableDeclaration has a VariableId
descendant, whose Name XPath attribute is exactly bill. You thus write your first attempt
in the XPath editor:
//VariableId[@Name = "bill"]
You can see the XPath result list is updated with the variable declarator.
If you try the query against the following updated snippet though, you can
see that the field declaration id is matched even though it’s not of type short.
public class KeepingItSerious {

    Delegator bill; // FieldDeclaration

    public void method() {
        short bill; // LocalVariableDeclaration
    }

}
You thus refine your XPath expression with an additional predicate, based on your examination of the Type node of the field and local variable declaration nodes.
//VariableId[@Name = "bill" and ../../Type[@TypeImage = "short"]]
Exporting to XML
You estimate that your rule is now production ready, and you’d like to use it in your ruleset.
The second button in the toolbar above the XPath editor (Tooltip: Export XPath to rule...)
allows you to do that in a few clicks: just enter some
additional metadata for your rule, and the popup will generate an XML element that you can
copy-paste into your ruleset XML. The resulting element looks like so:
<rule name="DontCallBossShort"
      language="java"
      message="Boss wants to talk to you."
      class="net.sourceforge.pmd.lang.rule.xpath.XPathRule">
    <description>
        TODO
    </description>
    <priority>3</priority>
    <properties>
        <property name="xpath">
            <value>
<![CDATA[
//VariableId[@Name = "bill"][../../Type[@TypeImage="short"]]
]]>
            </value>
        </property>
    </properties>
</rule>
You can notice that your XPath expression ends up inside a property of a rule of type XPathRule, which is how XPath rules are implemented.